Le plan de la semaine pour le 10 au 16 novembre.

0

Posted by scinanni | Posted in 7 Extended, Uncategorised | Posted on November 10, 2020

Allo ma classe de 7e année !

Voici le plan de la semaine.  Lisez les instructions attentivement svp.

Loader Loading...
EAD Logo Taking too long?

Reload Reload document
| Open Open in new tab

Download


Le plan d’activités de la semaine du 2 au 9 novembre (7e).

0

Posted by scinanni | Posted in 7 Extended | Posted on November 2, 2020

Bonjour mes élèves,

Voici votre plan d’activités pour la semaine !

Mr. C

Loader Loading...
EAD Logo Taking too long?

Reload Reload document
| Open Open in new tab

Download

Le cahier d’activités pour la semaine du 26 octobre au 3 novembre

0

Posted by scinanni | Posted in 7 Extended | Posted on October 26, 2020

Bonjour ma classe de 7e année,

Voici votre plan d’activités pour la semaine !

Mr. Cinanni

Loader Loading...
EAD Logo Taking too long?

Reload Reload document
| Open Open in new tab

Download

Le cahier d’activités pour la semaine du 19 au 26 octobre

0

Posted by scinanni | Posted in 7 Extended | Posted on October 19, 2020

Bonjour les élèves,

Voici le plan d’activités ( devoir et enrichissement ) pour cette semaine.  Tu dois compléter les activités qui sont marquées DEVOIR et tu peux aussi t’amuser à compléter les celles qui sont marquées ENRICHISSEMENT.

Bon travail !

Loader Loading...
EAD Logo Taking too long?

Reload Reload document
| Open Open in new tab

Download


La clé de correction et la stratégie M.O.P.P.E.

0

Posted by scinanni | Posted in 6 Core, 6 Extended, 7 Core, 7 Extended, 8 Core, 8 Extended | Posted on October 15, 2020

Dans nos classes de français, nous allons utiliser la stratégie MOPPE pour aider les élèves à s’auto-corriger et à relire leur travail.  Donc, avant que chaque élève remette son travail au professeur, il se sert de ces 5 étapes pour l’aider à revoir la qualité du travail.  Ensuite, le professeur utilisera la clé de correction afin de pouvoir guider l’élève lors de la correction de son travail.  Par exemple, un V placé à côté d’un verbe indique que le verbe n’est pas bien conjugué.  La lettre O à côté d’un mot indique à l’élève que le mot n’est pas bien écrit.

Puisque ceci a été expliqué en classe, on espère que ceci va aider chaque élève lors du processus d’écriture. Nous allons continuer d’aider nos élèves le plus possible car ceci est un étape importante dans leur cheminement d’apprendre à écrire en français.

Bonne écriture !

Mr. Cinanni

Bienvenue aux parents de la 7e année !

0

Posted by scinanni | Posted in 7 Extended | Posted on September 23, 2020

Dear Grade 7 Parents,

Please find below an embedded video which will be shared with you on parents’ night (Wednesday, September 23).

If you are unable to join us virtually, you may review the video at your convenience.

Thank you.

Mr. Cinanni


Que de bonnes habitudes !

0

Posted by scinanni | Posted in 6 Extended, 7 Extended, 8 Extended | Posted on September 10, 2020

Ah….après plusieurs semaines à la maison, on attendait tous cette journée…..la rentrée scolaire lors d’une pandémie sans précédent pour nos élèves.  Et pour se remettre sur nos pieds, pour remettre le train sur la voie ferrée en se dirigeant vers nos objectifs et nos rêves, quoi de mieux qu’une petite révision des 7 habitudes des étudiants? Cette image est tirée du livre de Stephen Covey.

7 Habits for Highly Effective Tweens & Teens | Boulder, Colorado

Que ce soit dans le cours d’anglais, d’hébreu ou de français, ces habitudes sont là pour que chaque étudiant puisse les rendre les leurs, pour les aider à s’épanouir, exactement comme un arbre en pleine croissance.  On ne peut qu’espérer que nos élèves auront assez de soleil pour atteindre leur potentiel!  Et là est le rôle de chaque professeur à OJCS.  Ensemble nous grandissons, ensemble nous sommes plus forts, ensemble nous sommes responsables les uns des autres.

Un guide de sites web en français pour nos élèves et nos parents !

0

Posted by scinanni | Posted in 6 Extended, 7 Extended, 8 Extended | Posted on May 9, 2019

Voici un guide avec des liens utiles pour pouvoir aider nos élèves et nos parents à jouer, à pratiquer….à s’améliorer en français dans leur temps libre.  Partagez ceci avec qui vous voulez….et amusez-vous, en français !

Loader Loading...
EAD Logo Taking too long?

Reload Reload document
| Open Open in new tab

Download

Adding Hebrew/French to your computer keyboard

1

Posted by apolowin | Posted in 6 Core, 6 Extended, 7 Core, 7 Extended, 8 Core, 8 Extended | Posted on February 5, 2019

Hello everyone,

This was put together for Hebrew, but the same rules apply for adding French to the keyboard, of course simply adding the French option instead of Hebrew. Very helpful for projects or other writing tasks. Thank you to Josh Max for putting this together.

Installing Hebrew keyboard on iPad or iPhone:
  • Go to Settings –> General –> Keyboard –> Keyboards
  • Click “Add new Keyboard…”
  • Scroll down and select “Hebrew”
  • That’s it!  To use the keyboard:
    • When typing select the globe icon in the bottom-left corner of the English keyboard.
    • Push and hold the globe icon and you will be able to select the Hebrew keyboard.
    • To switch back to English, simply push and hold the icon again and select “English” .
    • If you want the nikkud/vowels push and hold on the Hebrew keyboard character and select the what you need.
Installing Hebrew keyboard on Mac
  • Go to Apple menu > System Preferences.
  • Click Language & Text, and then click Input Sources.
  • Select “Hebrew” ( or Ivrit).
  • Be sure to check the “Keyboard and Character Viewer” box as well.
  • At the bottom, select the “Show Input menu in menu bar” checkbox.’
  • To use the keyboard:  At the top-right of your screen, you should now see the Input Menu. Click on the “U.S. Flag” option, and choose “Hebrew/ Israeli flag”.
    • You should now be typing in hebrew
    • To switch back just click and choose the US Flag
    • You may also want to choose “Show Keyboard Viewer” from this menu to see what characters match each key in this keyboard layout.

Installing Hebrew keyboard on Windows

  • First, activate the hebrew keyboard through the Control Panel:
    • Click on the Start button > Control Panel > Clock, Language, and Region > Region and Language.
    • Click the Keyboards and Languages tab, and then click Change keyboards.
    • Under Installed services, click Add.
    • Double-click Hebrew/Ivrit, double-click “Keyboard,” and select the options you want. Then click OK.
  • Next, turn on the Language Bar:
    • While you still have the “Text Services and Input Languages” window open (or open again following steps 1-2 above), click on the Language Bar tab.
    • Make sure the “Docked in the taskbar” option is selected. Click OK to close all control panel windows open.
    • Use the Language Bar to select which language you want to type in:
    • The Language Bar should now appear in the lower-right corner of your computer screen.
    • Click on the language abbreviation – ENG or HEB/ענר – then select the language you want from the menu.
    • You can also use the keyboard shortcut ‘windows key + spacebar’ to quickly switch back and forth.
  • To see what characters are associated with each key:
    • Click the Start button > All Programs > Accessories > Ease of Access. (In Windows XP, it’s called Accessibility.)
    • Then click On-Screen Keyboard to open the On-Screen Keyboard.
    • The On-Screen Keyboard will show you what letters are associated with each key. You can type the letters with your keyboard, or you can click on the letters on the screen.  When you press/click Shift, Ctrl, Alt, etc., you’ll see what new characters can be typed by using these combination keys.

Quoi faire pour apprendre une langue, vivre une culture ?

0

Posted by scinanni | Posted in 6 Extended, 7 Extended, 8 Extended | Posted on September 4, 2018

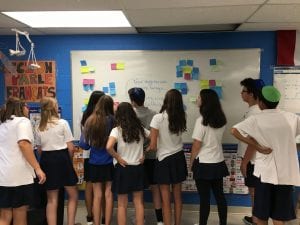
Les élèves de la 8e année ont collaboré pour établir des groupes de mots-clés afin de savoir le nécessaire pour apprendre une langue et vivre une culture différente.

Skip to toolbar